
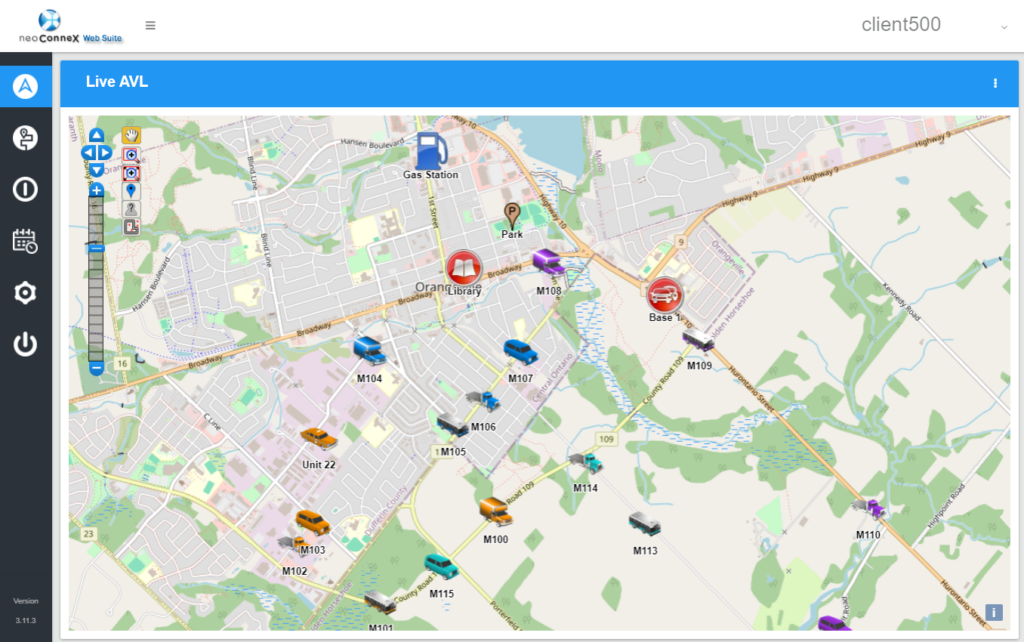
Live AVL Map Overview
-
To access the map settings you must be in the Live AVL.
-
Choose to open the options menu by pressing the Three Dots button on the top right.
-
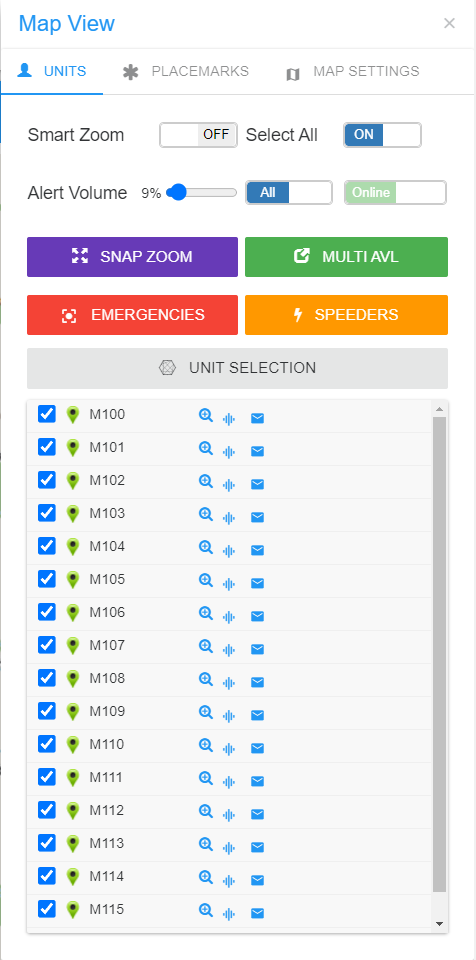
Choose Units from the navigation tabs.
-
Smart Zoom –Automatically keep the map zoomed in to the extent to show all units and placemarks on the map.
Select All – Toggle to quickly select/unselect all units in the list.
-
Alert Volume – Set the volume of audio alerts.
Online/Offline – Toggle to show online or offline units on the map.
-
Snap Zoom – Zoom to show the extent of all visible placemarks and units.
Multi AVL – Open a new browser window containing only the Live AVL View.
-
Emergency – Open a pop-up showing all uncleared emergencies.
Speeders – Open a pop-up showing all uncleared speeding reports.
While in the Map View menu, you are able to modify your unit view settings, including what units are shown and unit zoom behaviour.
-
Units can be selected to show on the map with the blue checkmark. If this is deselected, units will not show up on the map.
-
Icons beside the unit name provide different indications of the unit’s status. These include the following:
Green Pin – Unit is online and reporting GPS.
Red Pin – Unit is offline.
Orange Star – Unit is online but not reporting GPS. -
Icons further to the right have the following functionality:
Magnifying Icon – Map will zoom to last known location of unit.
Wave Icon – Map will zoom to unit and send out an immediate location request.
Envelope Icon – A new window will open allowing you to send a text message to the unit.
This portion of the article goes over unit selection and what the various states mean.

-
To access the placemarkers click on the PLACEMARKS tab.
-
To toggle placemarkers on or off click on the check box next to the placemarker you want to toggle.
-
Click on the magnifying glass to zoom to the placemarker on the map.
Under the Map View you can also view all your set placemarkers. You can choose which placemarkers to view from this menu.

-
To access the map settings click on the MAP SETTINGS tab.
-
Base Layer – This section allows you to select your preferred base layer map (e.g. Open Street Maps, Google Maps Streets).
-
Overylays – This section allows you to set what can be seen on the Live AVL map:
Unit – An individual unit with its designated style.
Placemark – An individual placemark with its designated style.
Circle Geofence – Proximity geofences that are created as circles.
Polygon Geofence – Proximity geofences that are created as polygons.
NOAA – If selected, weather info from the NOAA will be added and overlayed on the map. -
Unit Style – Various unit styles can be selected via drop down menu. Options include icons, arrows and pins.
-
Departments – This section allows for the Live AVL view to display specific departments. Departments that are toggled on will show on the map and departments that are toggled off will not.
-
Circle Geofences – Displays all created circle geofences that can be toggled on and off.
Polygon Geofences – Displays all created polygon geofences that can be toggled on and off.
Under the Map View menu you can also also modify map settings, including map base layers, overlays and unit symbols.

-
Check the NOAA box under Map View – MAP SETTINGS to activate weather overlay on the Live AVL map.
If the NOAA weather overlay is selected, live weather feeds that get updated every 15 minutes and overlayed on the Live AVL map.